Green screen (also known as chroma keying) is a powerful technique used to superimpose a subject over a new background in video editing. DaVinci Resolve, one of the most popular professional video editing tools, provides a quick and simple way to remove a green screen using its 3D Keyer tool.
In this tutorial, I’ll walk you through how to remove a green screen in DaVinci Resolve in just a few easy steps.
Step-by-Step Guide
Step 1: Set Up Your Timeline
First, import both your green screen video and the background video into DaVinci Resolve. Make sure to place them on separate video tracks:
- Video 2 Layer: This should contain the video with the green screen.
- Video 1 Layer: This is where you place your background video.
Step 2: Search for the “3D Keyer” Effect
Next, open the Effects Library by clicking on the “Effects” tab in the upper left corner of the DaVinci Resolve window.
- In the search bar, type 3D Keyer.
- Once you find it, drag and drop the 3D Keyer effect onto your Video 2 Layer (the green screen clip).
Step 3: Activate OpenFX Overlay
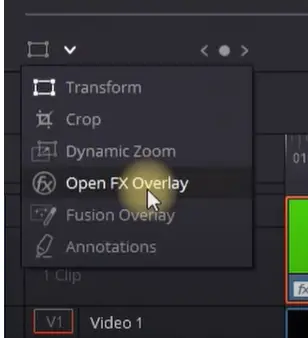
With your green screen video selected, go to the Inspector Panel located on the right. Here, you should see the “OpenFX” tab, which contains your 3D Keyer effect.
- Now, in the preview window, enable the OpenFX Overlay option by clicking on the rectangle icon.
- This will activate the keying controls on your green screen video.
Step 4: Select the Green Area
The next step is to use the keying tool to select the green area of your video. Simply click and drag your mouse over the green part of your video. The 3D Keyer will automatically remove the green screen from the selected area.
- You can adjust the selection to include any leftover green areas by continuing to drag your mouse over them.
Step 5: Fine-Tune the Key
After the initial selection, you may notice some edges or parts of the background still visible. To refine the key, adjust the following settings in the Inspector:
- Denoise: Helps remove noise from the key.
- In/Out Ratio: Adjust the smoothness of the edges.
- Matte Finesse: Tweaks to improve the overall quality of the key.
Step 6: Preview the Result
Once you’re happy with the keying, play back the video to ensure everything looks smooth. Your green screen video should now be seamlessly blended with the background video.
And That’s It!
You’ve successfully removed the green screen from your video using DaVinci Resolve. With a bit of practice, you’ll be able to key out backgrounds quickly and efficiently for any project.
Bonus Tip: You can also experiment with different keying effects, adjust lighting, or even try adding additional visual effects to further enhance your video. DaVinci Resolve provides an array of tools to help you get creative with your video editing.
I hope this guide helps you master green screen removal in DaVinci Resolve. Happy editing!
Feel free to share this tutorial if you found it helpful, and don’t hesitate to reach out if you have any questions!